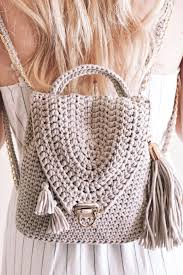
Crochet bags are fashionable, functional, and adaptable items that you may make to fit your own preferences and requirements. With only one design, you can make a tote bag, a shoulder bag, and a clutch with the simple 3-in-1 crochet bag pattern that we’re going to share with you today. Beginner and intermediate crocheters who want to improve their abilities will love this design. Come on, let’s get started!
Materials Needed
- Yarn: Choose a sturdy yarn such as cotton or a cotton blend. For a more structured bag, you might consider using a yarn with a bit of nylon or acrylic.
- Crochet Hook: Use a hook size recommended on the yarn label. Typically, a 4.0 mm (G) or 5.0 mm (H) hook works well.
- Stitch Markers: These will help you keep track of your rounds.
- Scissors: For cutting yarn.
- Yarn Needle: For weaving in ends.
- Bag Handles (Optional): If you prefer pre-made handles for your tote or shoulder bag.
Abbreviations For Crochet Bag
- ch: Chain
- sc: Single Crochet
- dc: Double Crochet
- sl st: Slip Stitch
- inc: Increase (2 sc in the same stitch)
- dec: Decrease (sc 2 stitches together)
- st(s): Stitch(es)
Pattern Instructions
Base of the Bag
- Chain of Foundation: Chapter 41.
- Row 1: Work 40 single crochets in the second ch from the hook and across. Rotate.
- Ch 1, sc in each st across in row 2. Rotate.
- Continue Row 2 until you have completed 10 rows.
Forming the Sides
- Round 1: Ch 1, work 3 sc in each corner, then work your way around the whole rectangle base. Join to the first sc with a sl st. (96 sc)
- Ch1, sc in each stitch around in round two. Join to the first sc with a sl st.
- Until the sides are 8 inches from the base, repeat Round 2.
Creating the Tote Bag
- Handles (Optional): You can crochet your own handles or attach pre-made ones.
- Crochet Handles: Ch 61, sc across and in second ch from hook. Use sl st to attach to the bag’s opposing sides, or sew firmly.
- To complete the tote, tie off and weave in all of the ends.
Converting to a Shoulder Bag
- Strap: Ch 121 (or the appropriate shoulder strap length).
- First row: Work 120 sc in the second ch from the hook and across. Rotate.
- Ch 1, sc in each st across in row 2. Rotate.
- For four more rows, repeat row two. Securely fasten.
- Fasten the Strap: Make sure the strap is firmly attached by sewing or sltting it to the bag’s sides.
Converting to a Clutch
- Fold and Secure: Fold the upper part of the bag in the direction of the bottom.
- Closure: To secure the flap in place, fasten it with a button, snap, or Velcro.
- Optional Embellishments: To give the flap some more flair, add tassels, beads, or other ornaments.
Customization Tips
- Colors and Stitch Patterns: To give your bag a distinctive appearance, try experimenting with different colors and stitch patterns, such as alternating rows of sc and dc.
- Lining: Think about giving your bag a fabric lining for increased durability.
- Add internal or external pockets to your design for added utility.
Care Instructions
Your crochet bag will last longer if you hand wash it in cold water with a small amount of detergent and then lay it flat to dry. To avoid stretching, do not twist or wring the bag.
Conclusion
This simple 3-in-1 crochet bag pattern will let you make a multipurpose piece of clothing that works for any setting. This bag will come in handy whether you’re going to the market, going on a casual stroll, or attending an evening function. Cheers to your crocheting!
Related Article
Knitting Sweater: 5 Amazing Patterns