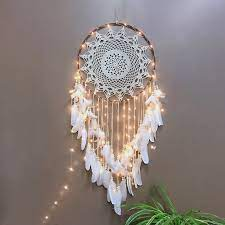

Dream catchers are exquisite, symbolic crafts that have been used for thousands of years in many cultures to trap bad dreams and let happy dreams flow through. Dream catchers are classic items that gain a personal touch when crocheted. We’ll lead you through the steps of making your very own crochet dream catcher in this comprehensive tutorial.
Materials Needed:
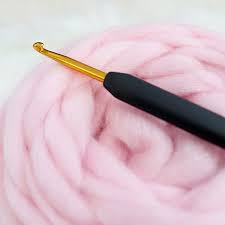
- Crochet thread or yarn (size 10 crochet thread is recommended)
- Crochet hook (size 1.75mm – 2.25mm)
- Metal or wooden hoop (8-12 inches in diameter)
- Scissors
- Tapestry needle
- Beads, feathers, and other decorations (optional)
Dream catcher: Step-by-Step Instructions

1. Get Your Hoop Ready:
Start by winding yarn or crochet thread around the hoop. This will make it easier to attach the crochet work and give it a lovely finish. Tie a knot to secure the end, then cut off any extra thread.
2. Construct the Centerpiece:
Round 1: Make a magic circle first. 8 single crochets (sc) should be worked into the circular. Close the circle by pulling tightly, then slip stitch (sl st) to the first sc.
Round 2: Double crochet (dc) in the same stitch, 2 dc in each stitch around (16 dc), and chain (ch) 3 (counts as initial dc). Join at top of beginning ch-3 with sl st.
Round 3: Ch 3 (first dc counts), 1 dc in the next stitch, 2 dc in the next stitch, 1 dc in the next stitch, repeat from * to * around (24 dc). Join with a sl st to the top of the beginning ch-3.
3. Extend the Design:
Repeat from * to * around in round 4. Round 4: Ch 4 (counts as dc and ch 1), skip next dc, dc in next dc, ch 1, skip next dc. Join to the third ch of ch-4 with a slip stitch.
Round 5: Work from * to * around, sl st into the next ch-1 space, ch 4, dc in the next ch-1 space, ch 1. Join to the third ch of ch-4 with a slip stitch.
4. Proceed Until Target Dimensions:
Up until the crocheted item fits the size of your hoop, keep working in the pattern of double crochets and ch-1 gaps, increasing the amount of ch-1 spaces in each round.
5. Connect with the Hoop:
Put the piece you crocheted within the hoop. Making single crochets around the hoop while catching the ch-1 intervals, sew the outer edge of the crochet piece to the hoop using the crochet thread or yarn. Ensure that the crochet piece is stretched over the hoop in an even manner.
6. Include Extras:
- To embellish the crocheted piece, use a tapestry needle to attach beads or other embellishments.
- Using crochet thread or yarn, attach feathers or other hanging decorations to the dream catcher’s bottom.
7. Final Details:
After securing each knot, cut off any extra thread. Verify that everything is fastened firmly.
Advice and Techniques:
- Tension: To guarantee that your crochet work is stretched equally over the hoop, maintain a constant tension.
- Patterns: Try out several crochet patterns to make original creations.
- Decorative elements: Add feathers, beads, and other items that reflect your personal flair to your dream catcher.
In summary:

Making a dream catcher out of crochet is a creative and fulfilling craft. With the help of this tutorial, you can create a stunning artwork that will complement your interior design while also having a meaningful meaning. Take pleasure in the process and add decorations and personal touches to make it uniquely yours.
Gathering supplies including yarn, crochet thread, a crochet hook, feathers, beads, and a metal or wooden hoop is the first step in crocheting a dream catcher. Start by tying the yarn tightly around the hoop. Make sure the stitches are regularly spaced as you weave the crochet thread into the hoop to form a net-like design. As you progress, add beads to the netting to give even more ornamentation. When the net is finished, use thread or yarn to secure feathers to the underside of the hoop. Add ornaments and different colors to your dream catcher to make it uniquely yours.
Cheers to your crocheting!
Related Article
Crocheting Dress of Lord Krishna In 4 Easy Steps